TEN steps to Titanium elastic nailing in femur
- Position the patient. Distraction on fracture table. Protect and pad perineum and the normal limb.
- Select the nails: Nail size is 0.4 x D
- Bend the nails: Bending length = tip to fracture distance x 2, Bending height = 3 x D Uniform smooth bend, Medial entry nail will have more bending length. Initial part may be bent little more. Two nails are bend equally in C shaped manner Some cases C and S construct may be necessary. Medial nail is bend perpendicular to the entry tip plane.
- Entry point: 2.5 to 3 cm from growth plate. Medline in lateral view. Avoid suprapatellar pouch (anterior) and femoral vessels (medial). Make entry with K wire, enlarge with cannulated drill bit and owl and angulate with curved owl.
- Insert the nails: one after the other with a chuck using rocking movements. Start with bend directed inferiorly and turn 180 once inside the canal. Avoid rotating movements and hammering. Insert each nail bit by bit till you reach the fracture site. If stuck withdraw a bit rotate and go forward again with rocking movements.
- Fracture reduction: is done by traction and translation using F tool. Use the bent tip to negotiate the fracture site. Once the fracture is negotiated turn the nail to cause translation and perfect end to end opposition to felicitate passage of second nail. If needed can directly manipulate the fracgments using k wires, shanz screws or passing a wire through fracture site to manipulate the fracture site.
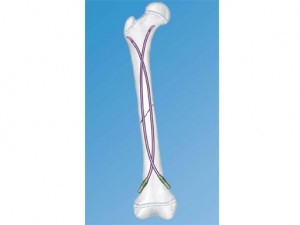
- Pass the nails: past the fracture to sit into final position. One of the nail tip should be pointing posteriorly to maintain femoral bow. Confirm R- rotation S-spindle formation, T- Tips direction
- If the construct is length unstable add endcaps. If rotation and/or length unstable add ex fix. Thump the knee and release traction to collapse the fracture.
- Cut the nails: leaving 1 cm of nail out from the entry point and gently bend more so that the nail lies comfirtably along the flare of bone. Make the part of the nails beyond the entry point rough by making marks with nail cutter for better grip in future. Gently tap the nail with angled tamp so that the hockey bend fixes itself into cancellous bone of the proximal femur.
- Close the wound. Move the knee through the range of movement to confirm that nail is not caught in soft tisues